Enhance Your Lashes: A Beginner's Guide to Using L Curl Lashes
L curl lashes offer a beautiful curl and lift to your natural lashes, providing a stunning and wide-eyed look that lasts. Whether you're a seasoned lash enthusiast or new to the world of lash extensions, mastering the art of using L curl lashes can take your beauty routine to the next level. In this beginner's guide, we'll explore everything you need to know about using L curl lashes for a flawless finish.
What are L Curl Lashes?
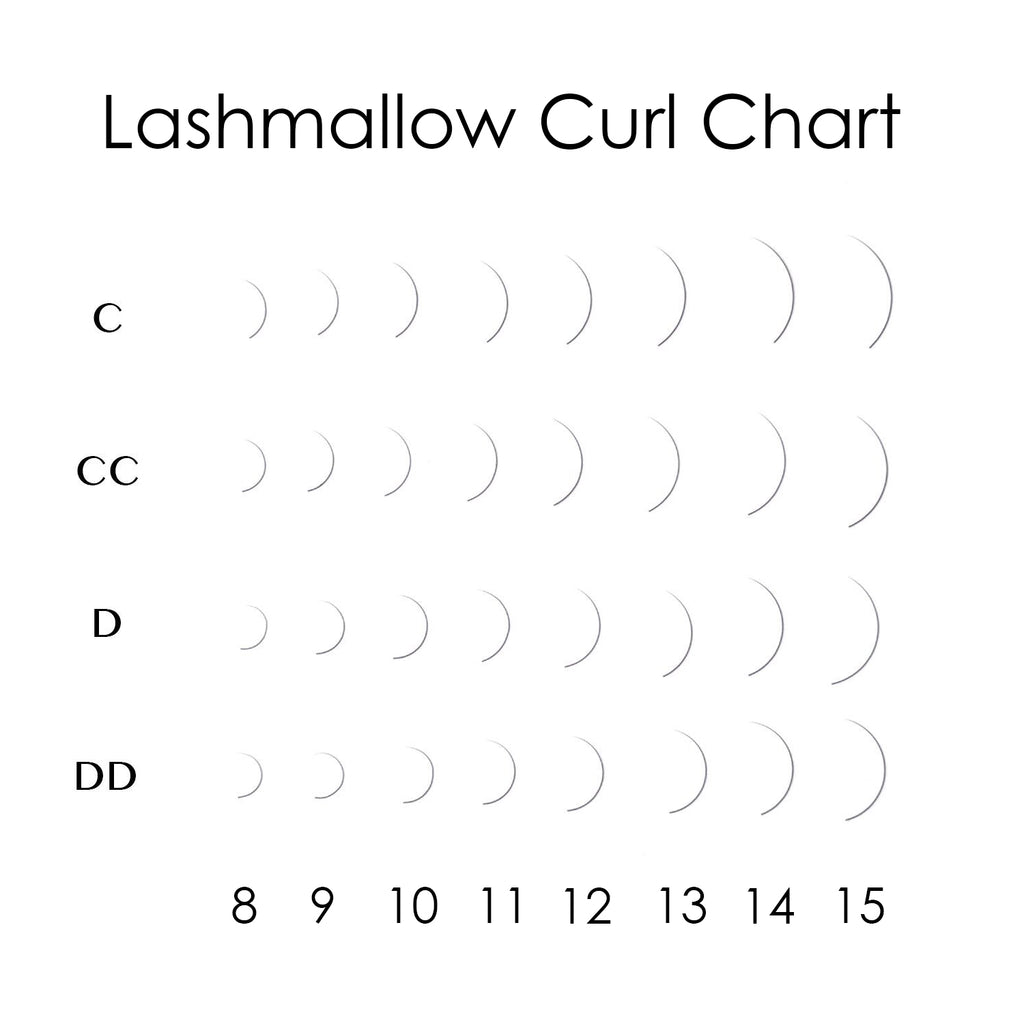
Before we dive into the application process, let's first understand what L curl lashes are. L curl lashes are synthetic extensions that are designed with a unique L-shaped curl. This distinct curl mimics the natural shape of your lashes, providing a subtle yet captivating lift that opens up your eyes. Whether you have straight or downward-facing natural lashes, L curl lashes can help create the illusion of longer, fuller, and more voluminous lashes.
Step-by-Step Guide to Using L Curl Lashes:
-
Preparation is Key: Start by cleansing your natural lashes with a gentle oil-free makeup remover to ensure they are clean and free of any residue. Next, use a lint-free pad to gently pat dry your lashes.
-
Select the Right Lashes: Choose the appropriate length and thickness of L curl lashes based on your desired look and the natural shape of your eyes. Remember, shorter lengths and thinner diameters are ideal for a more natural look, while longer lengths and thicker diameters provide a more dramatic effect.
-
Isolate a Natural Lash: Using tweezers, carefully isolate a single natural lash by gently separating it from the surrounding lashes. This will create a secure base for attaching the L curl lash extension.
-
Apply Adhesive: Dip the base of the L curl lash extension into a small amount of lash adhesive, ensuring that only a thin layer is applied. Be sure to use a high-quality, latex-free adhesive that is safe for use around the eyes.
-
Attach the Extension: With precision and care, place the adhesive-coated base of the L curl lash extension onto the isolated natural lash, as close to the lash line as possible. Hold the extension in place for a few seconds to allow the adhesive to bond securely.
-
Repeat the Process: Continue isolating natural lashes and applying L curl lash extensions one at a time, working your way along the lash line from the inner to the outer corner of the eye. Be sure to leave a small gap between each extension to prevent clumping and ensure a natural-looking result.
-
Final Touches: Once all of the desired lashes have been applied, gently brush through them with a clean mascara wand to blend the extensions with your natural lashes and remove any tangles or excess adhesive.
-
Aftercare: Avoid getting your lashes wet for the first 24 hours after application to allow the adhesive to fully cure. Additionally, refrain from rubbing or pulling on your lashes and avoid using oil-based makeup removers, as these can weaken the adhesive bond.
With the right technique and a little practice, using L curl lashes can be a simple and rewarding way to enhance your natural beauty. No matter you're looking for a subtle everyday look or a glamorous evening style, L curl lashes offer versatility and stunning results that are sure to turn heads. So go ahead, give your lashes the lift they deserve and embrace a more radiant and confident you!
Private Label Eyelashes Extension Wholesale
As a private label lashes manufacturer, we could supply both eyelash extensions and strip lashes in most materials. Regarding private label for lashes extensions, most popular packages are cardboard boxes, magnetic paper boxes and plastic boxes.
We could custom both paper cards and size stickers for lash extensions.
We also private label and add your logo to lash cleansers and eyelash extension aftercare kits. We help lash artists and lash trainers brand their own lash products.